
A long time ago, my Father-in-Law gave my partner, who is a photographer, one of his old tripods. The tripod may actually even belonged to my partner's grandfather, so it already showed its age with some fixes here and there.
Friday, November 22, 2024


Monday, August 1, 2022
[ENG] KitchenAid® Attachment Organizer

Issue:
As avid bakers, my partner and I upgraded to a KitchenAid® Stand Mixer, which comes with multiple useful attachments - a Whisk, a Dough Hook, a Beater, and a Silicone lined Beater. Unfortunately, the multiple attachments require storage as only one can be mounted at a time, so the rest usually lay loose in a bowl somewhere.
Requirement(s):
- Convenient, accessible
- Organized
- Out of the way
Process:
As I wanted to keep our kitchen counter clear, I opted for a hanging approach under our cabinets. With the KitchenAid attachments designed to hang already, I decided to imitate their stem design. The stem of the Stand Mixer was measured using a set of digital calipers. To check the type of fit, I measured the corresponding holes in the attachments. Due to the dimensional considerations when it comes to 3D Printing, I sliced the stems parallel to the axis to minimize the overhanging material. Additionally, this solution reduced the contact between the 3D printed stems and attachments and gave me a natural flat area which would prevent the stems from rotating while mounting the attachments.

Initially, the design would mounted parallel to the mixer, so the dimensions were limited to the size of our cabinets. Knowing my maximum distance, I laid out the design on paper to avoid interference between the different attachments when mounting and once mounted, including which direction everything would be "facing".
I modeled the stems, boards, and stand-in attachments using Autodesk Inventor Professional 2020. As printing the board would be inefficient and expensive use of the 3D printer, I split the mounting board into two stacked sections that could be Laser Cut and engraved. The height of the stem bases were matched to the stacked thickness of the boards to give us a flat surface on which to mount against our cabinets. The models were assembled for fit and interference checks before exporting to appropriate formats for printing.


I signed up and took the required Laser Cutter safety course at OpenWorks Baltimore, and cut the boards out of plywood by the end of the class. I set up and printed the stems (and Drain Standoff) on another visit.


Once I had all the materials on hand, I checked the fit between all the parts, sanding/shaving as necessary. After making sure my wood screws wouldn't poke through the bottom, I installed the organizer with no issues so far.


Possible Improvements:
There were some dimensional issues with some tightness at the stems that required some sanding/shaving, so the models will be modified to account for the tolerances. Originally it was designed to be attached parallel to the mixer, but the perpendicular direction was determined to be better as it would give us the freedom to move the mixer sideways. With this restriction being lifted, the boards could be expanded to include more stems.
Autodesk's DXF utility has trouble exporting text, which affected the label for this and another project. I will need to find the correct setting or workaround.
Monday, July 18, 2022
[ENG] Drain Mushroom Standoff

The Issue:
We bought a commercial Drain Mushroom plug to catch too much of our hair from going down the drain. We found that the mushroom top would drop on numerous inconvenient occasions:
- When too much hair was caught in the filter.
- When the water level would be too high, even while draining.
- When the person showering would step on the top.
The Requirements:
The solution should:
- Keep the mushroom at drain height when installed
- Should be easily removable, if needed
- Be comfortable to remove
The Process:
I measured the mushroom's stem diameter and height; and the mushrooms head's diameter and seat. The stem diameter and height gave me dimensions for gap in the "C" shape, which would let us slot in the standoff easily. The head diameter and seat will ensure the device isn't too large and give me the envelope of my design. Rounded finger grooves would give the user a natural place to pull the standoff from.

With all these in place, I modeled it in Autodesk Inventor Professional 2020 (a screenshot shown above). I am fortunate to have a dedicated Maker Space with 3D Printing capabilities available here in Baltimore, called Open Works. After taking a recommended 3D Printing class, I printed the Standoff in PLA (PolyLactic Acid) below with no issues.

It is currently installed and has been working well.
Possible Improvements:
Although PLA is somewhat water-resistant, it can degrade with constant contact to water. While it won't be submerged in water (as long as the filter is cleared consistently) while in regular operation, the Standoff may degrade in the long term. If I were to print it again, I may opt for ABS (Acrylonitrile Butadiene Styrene) as it is more water-resistant and would suggest it for future prints.
Thank you for reading.
Saturday, December 11, 2021
[Hearthstone] Fractured in Alterac Valley Pack Opening (EU Server)
Opened 53 Fractured In Alterac Valley Hearthstone Packs in the EU server:
- Common - 193
- Rare - 54
- Epic - 13
- Legendary - 5 (Bearon Gla'shear; Saidan the Scarlet; Caria Felsoul; Wing Commander Mulverick; Najak Hexxen)
- Total: 265
- Golden - 6
Some highlights after the break
Friday, December 10, 2021
[Hearthstone] Fractured in Alterac Valley Pack Opening (NA Server)
Opened 55 Fractured In Alterac Valley Hearthstone Packs in the NA server. The distribution was
- Common - 192
- Rare - 65
- Epic - 14
- Legendary - 4 (Wildheart Guff; Xyrella, the Devout; Cera'thine Fleetruner, Captain Galvangar)
- Total: 275
- Golden - 15
Some highlights after the break
Wednesday, May 5, 2021
Star Wars 1/12 Clone Trooper

Inspiration:
I always considered myself a casual Star Wars fan: I watched the original trilogy on VHS multiple times and every movie in the prequel and sequel series in theaters. It wasn't until Episode II: Attack of the Clones came out alongside the original Star Wars Battlefront I and II that I took a deeper interest in the story, especially the Clones themselves. The Clone War is my favorite era - full scale campaigns with sides of comparable power fighting against the other. The Clones' stories as individuals trained to be soldiers without the freedom and choice in the matter. In trying to absorb as much media as possible, I read the Star Wars: Republic Commando series twice, because it finally told the story from the Clone perspective. I am currently watching the Star Wars Clone Wars animated TV show which is giving me a similar sense.
I was ecstatic when Bandai announced their intention to make the Clone Trooper. Their design has always spoken to me, especially their Phase I helmet and gear. The kit being a blank slate also gives us modelers the opportunity to customize it as we see fit. One of the issues when it was first released was actually getting the kit though - no American/US shop seemed to sell it and the import of it (and many other Bandai Star Wars kits) seemed to be banned for a while. It wasn't until a few years after its release that I found one at Discount Hobby Warehouse in San Diego, CA
In my curiousity about the kit, I looked up reviews online and found a few modelers. The one that got me most excited was IC Model Kits and Sculpts's "How to make your Bandai Clone Trooper Look Like a SideShow Figure" video (unfortunately, he has taken down the video). After watching this multiples times, looking at the process and techniques, I was ready to tackle my own.
Now, while I had the option to pick one of the many trooper designs and color schemes, I elected to keep the Clone Trooper in Phase I with no decoration, because I wanted this to represent the Trooper's first sortie in the Battle of Geonosis.
Now, while I had the option to pick one of the many trooper designs and color schemes, I elected to keep the Clone Trooper in Phase I with no decoration, because I wanted this to represent the Trooper's first sortie in the Battle of Geonosis.
Sunday, February 14, 2021
Haropla Haro - Penguin


Inspiration:
I've usually found Haros to be cute, cheerful characters. Their inherent roundness makes them good comedic characters with a lot of personality. I also like birds, stemming from my family having parakeets for a few years now. When a someone on YouTube ran the "Balls for Balls" contest, I decided that now would be a good time to purchase a Haro from Discount Hobby Warehouse in San Diego, CA.
My original intention was to paint this kit in a lighter shade of blue that would match our wedding colors, but it seemed too simple. After some thought, I had the idea to make the Haro look like a round birb. After finding a suitable lineart file that would be compatible with Microsoft Paint, I came up with two color schemes and multiple layouts. With the help of my wife, I decided to go for the Penguin color scheme with the hoodie layout.

Monday, February 8, 2021
WIP: HaroPla Haro - Penguin

Inspiration:
I've usually found Haros to be cute, cheerful characters. Their inherent roundness makes them good comedic characters with a lot of personality. I also like birds, stemming from my family having parakeets for a few years now. When a someone on YouTube ran the "Balls for Balls" contest, I decided that it would be a good time to purchase a Haro from Discount Hobby Warehouse in San Diego, CA.
My original intention was to paint this kit in a lighter shade of blue that would match our wedding colors, but it seemed too simple. After some thought, I had the idea to make the Haro look like a round birb. After finding a suitable lineart file that would be compatible with Microsoft Paint, I came up with two color schemes and multiple layouts. With the help of my wife, I decided to go for the Penguin color scheme with the hoodie layout.


You can follow my progress on my Twitter @chetario starting on March 3rd, 2019.
Thursday, February 4, 2021
1/144 HGUC MSZ-008A1 ZII-A1 Amuro Custom
1/144 HGUC MSZ-008A1 ZII-A1 Amuro Custom

Inspiration:
When the Gunpla Time UC Competition was announced in the Discord server, I felt like this was the inspiration I needed to build gunpla again. I took the opportunity to go to Discount Hobby Warehouse in San Diego, CA and look at their stock of kits. After browsing their selection, I opted to go for the unusual design of the ZII over the other typical options due to its origins in the Mobile Suit Variations.
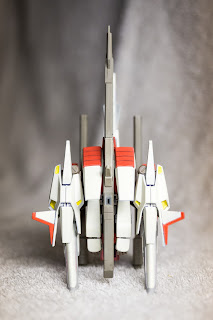
Being a Zeta series Mobile Suit, I looked to other Federation and AEUG designs for inspiration, which is when I came upon the Zeta Plus. While the grey variation seemed monotone and hard to pull off in plastic form, I really liked the red and white version, especially with the Amuro connotation.
Since I knew what colors I wanted, I looked online and was relieved to find that there was lineart that was compatible with Microsoft Paint. This helped save some time in the long run. Now I just had to play around with the layout - did I want to go for a straight pallete swap or something closer to the "inspiring" mobile suit. I was stuck on three options, so I put out a call for help which @TimberNewtype on Twitter responded to quickly. I sent him the three choices and we came together to come up with the final design below.

Process:
The entire model, save small details, was airbrushed using the Badger 105 Patriot with a Central Pneumatic 100 PSI, 3 Gallon Air Compressor. I used 3 stickers on the head for the eyes, front, and back camera.
You can follow the process of building this model on my Twitter page @chetario starting in October 9, 2018 forward. You can also read the Work-in-Progress post from last week.
Colors:




- Mission Models Mecha Master Acrylic Primer - Off-White
- Red: craftsmart Acrylic Paint Bright Red, Orange, White custom mix
- White: craftsmart Acrylic Paint White, Tan
- Frame: craftsmart Acrylic Paint Brown, Gray, Tan
- Light Grey: craftmart Acrylic Paint Grey, White
- Yellow: craftsmart Acrylic Paint Yellow, White
- Green: craftsmart Acrylic Paint Green, White
- Vallejo Gloss Varnish
- Vallejo Matte Varnish
- Vallejo Model Wash - Black
Basic Shots:


Mobile Armor:


Accessories:


Action Poses and Detail:


Verdict:
Overall, I found this model kit to be an enjoyable build. I keep finding it hard to stand though due to the different directions the lines in the design want to go - between the feet and chest, the angles make it seem as if he is squatting. The beam rifle and Mega Beam Cannon run into some interference issues with the elbow or backpack too.
If I had more time, I would have attempted to fuse more of the seam lines and seal the paint a little better. You may notice some unintentional paint chips revealing the blue base plastic. I asso need to be more aware of painting every surface, some blue can be seen poking out of certain places. With the above reasons and the high caliber of competition, this model did not place in the top 3, but congratulations to the winners.
The pictures above were taken with a Canon 6D Camera, with a Tamron SP 24-70mm f/2.8 lens. All pictures were post-processed using Adobe Lightroom.
Thank you for viewing this thread and the support. Constructive criticism is always welcome and I will respond to each comment. Advice on how I can improve is also appreciated.
Keep Building, My Friends!
Subscribe to:
Posts (Atom)